- Firstly, you need to open your Gmail account settings (a gear-wheel icon in the right-top corner).
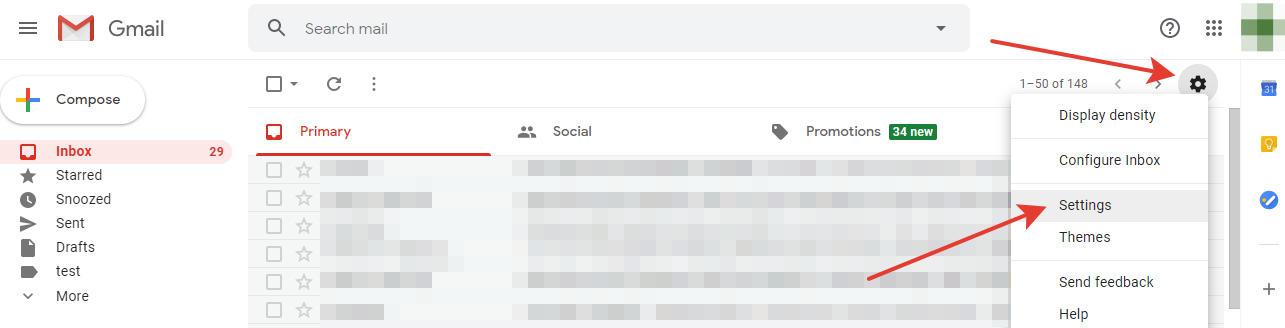
- Now choose the
Settingsoption. - Look at the top and choose
Accounts and Import. - Find the
Send email asoption and chooseAdd another email address.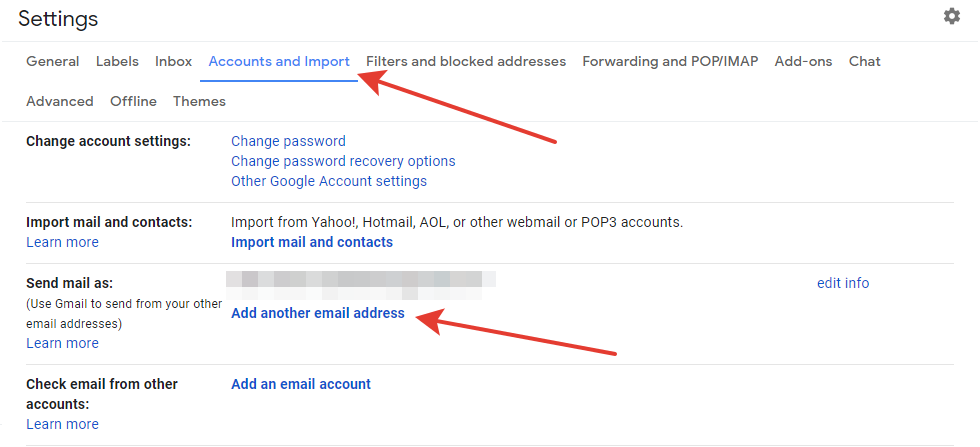
- After the fourth step, a pop-up page will be displayed. You need to enter the name that will be shown to your mail receivers and an email address. Pay attention to a
Treat as an aliascheck-box - if you don’t make it checked, then incoming mails from the linked email won’t be received and displayed in your Gmail account.
Moreover, there is an option calledReply-to- here you can choose an email where messages will be received (if you want it to be the linking one, then you don’t need to change here anything).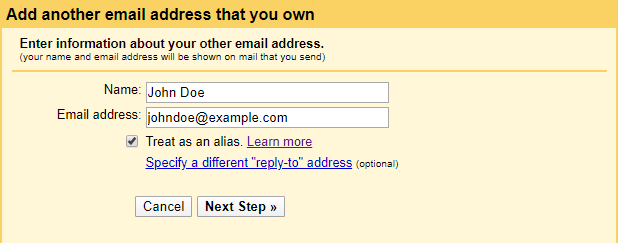
- Press the
Next stepbutton. - The next pop-up page is dedicated to linking email settings. Gmail usually fills all the spaces automatically and users need only to enter the password. However, if the SSL/TLS, SMTP Server and Port fields are not filled automatically, you need to fill it by yourself (See server email settings here).
SMTP Server: mail.tehillamedia.com
Username: Your username is your full email address (you@yourwebsite.com)
Password: Your default password is Password@100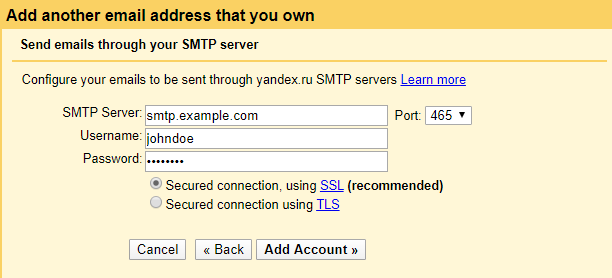
- Press the
Add Accountbutton. - After the eighth step, Gmail will automatically send a verification code to the linking email. Fill it in the required field and press the
Verifybutton. It is recommended to copy your verification code from the received email and paste it into the field instead of hand input in order to avoid any mistakes.
- If you entered the verification code correctly, Gmail will update the page and you will see your linked email in the field
Send message as. - The process of email linking is ended. Now you can create a new message in Gmail and choose any of your emails that you have linked from the
Fromdropdown.
Search Knowledge Base Articles
How to add another email address to your existing Gmail account
Sometimes users need to have more than one email account in their Gmail from which they can read and send emails. Here are instructions to receive (and send) messages on a Gmail account from another email address (or addresses).
Did you find this article useful?
Related Articles
-
How to access your Email
We use the Roundcube webmail client. You can learn more about Roundcube webmail here.To login to your email account go to webmail.tehillamedia.comAt t... -
Change Email Password
1. Login to your email account in Roundcube Webmail at webmail.tehillamedia.com 2. Click “Settings” on the top-right corner just below you... -
Limits and restrictions for outgoing emails with our standard email server
To ensure high quality, fast delivery, and spam protection, the following hourly and daily limits for outgoing mail apply to our standard email accoun... -
How to setup my email account in Windows 10 Mail app?
You can create an email account in Windows 10 Mail app following these instructions: Click on the gear icon in the bottom left corner and then choose... -
How to set up my email account in Windows Live Mail?
Here is how you can manually set up an email account in Windows Live Mail: Open your Windows Live Mail. Click on the "Add an email account" button lo...